Implementing a variety of co-teaching models, like “Teach Half, Then Switch” or station teaching can be beneficial for students who may have difficulty in the traditional classroom setting. These implementations, however, often require desks to be rearranged. In “Teach Half, Then Switch” the co-teachers each take half of the class, ensuring that there’s space between each half so as not to distract the students. However, some classroom configurations just aren’t that easy to change.
There are some very common scenarios that make changing a classroom setup difficult:
- Class scheduling, such as a different teacher coming in to use the room immediately after the period ends, can make it tough to shift desks out of position with time left to actually teach.
- Actual size of the classroom is too small or too strangely shaped to regroup the desks.
- Technology in the classroom – especially if it has been installed a little at a time, over several years – can get in the way of shifting the desks around effectively.
- Science lab tables are often fixed firmly to the floor and can’t be moved.
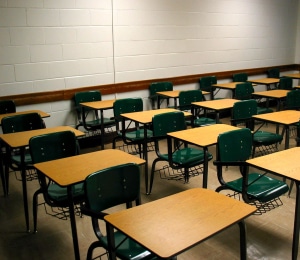
- Classrooms are absolutely crowded with desks to accommodate large numbers of students, making it difficult to move anything around.
So, what can co-teachers do in these situations to change the classroom setup so that they can try a new co-teaching implementation?
 First, don’t let a classroom’s odd geography get you down. Collaborate with your co-teacher to plan out ways to work with the space as best as you can. Can you stack extra chairs and tables safely out of the way? Can you leave the desks in place and instead shift the students around the room? Is there an unused classroom nearby where you can take half the class for the co-teaching implementation? Can you incorporate standing stations so that more students can collaborate around a table Bed risers can raise any four-legged table. To ensure safety, be sure that the table is steady.
- Draw out a desk grouping on graph paper*, taking into account the dimensions of the classroom and the number of desks in it.
- Come up with 2 to 3 versions of possible desk arrangements. Compare them with your co-teacher’s ideas until you both agree on 2 to 3 designs for alternate seating charts.
- Put each seating chart/arrangement on a separate piece of paper and color-code each diagram.
Now, you can quickly decide on which seating arrangement to use on a particular day and share that with your co-teacher, who has the same color-coded arrangement to refer to. Depending on the class, you can even hang a copy of the day’s desk arrangement next to the door and then you can ask students to help rearrange the desks according to the visual reference chart. Something like, “Hey, look at the charts by the door. We’re going to be using the blue chart setup today. Would you help us out by arranging the desks in that pattern?”
This doesn’t work for all classes, of course. It may be best for grades 5 thru 12, and that also can vary depending on the abilities of the students in your class. Still, having a few “set” classroom configurations and asking students to help with setup not only saves co-teachers time and effort but also can increase the enthusiasm and engagement of students, too. Kinesthetic learners may show up early for class just so they have the chance to help move desks around.
Try out a few different desk configurations. If a setup doesn’t work or is too complicated and time-consuming, throw it out and try another one. Keep experimenting until you find an implementation and class setup that works best for you. Good luck!
* Can’t draw, or having trouble getting the classroom dimensions right? IKEA has a free online Room Planner tool that allows you to put in a room’s length, width and height, door and window locations, and custom “objects” that can be scaled to the size of the classroom desks. Jordan’s, another furniture store, offers a similar tool. While these were developed to sell furniture to people, they can be really useful in translating the real dimensions of a classroom to an 8.5×11-inch sheet of paper.
After you try these ideas, I’d LOVE IT if you’d post photos of your classroom configurations in the comments section or email them to me so I can add them to this post!
Here’s Susan with more insights about dealing with Over-crowded classrooms:
 Explore even more tips, tools, and resources for collaboration at TheHowofCo-teaching.com!
Bring Susan to your campus!
Featured seminar – Co-teaching and Collaboration


